Docker Shit
Docker Setup
I'm assuming you have docker installed already. All good. I would be creating a folder into which we will create a sub-folder for every docker app you want to run.
You can just create one massive docker-composel.yml and put every app inside that, but from my experience, it gets hard to manage.
On my system, I have the following layout:
apps/
├── home-assistant
├── jellyfin
└── traefik
I have a whole bunch of other apps, too, but you get the idea.
So in principle, every folder for an app will have a docker-compose.yml file in it. (Once the container has started, it's likely that it will create a bunch of other stuff in that folder, too.
You're going to be running a LOT of docker compose commands. It gets boring typing that shit out all the time, so I would recommend creating a few shell aliases for example:
alias dc='/usr/bin/docker compose'
alias dcf='/usr/bin/docker compose logs -f'
Network and DNS Setup
General
First up, if you want to connect to any of your apps from the Interwebs, you are going to need a domain. Go get one. CloudFlare is a good spot to buy and manage a domain. If you want a .com.au you'll need an Australian registrar.
For Traefik to do what it does, both from a traffic routing, and SSL certificate perspective, you need DNS CNAME or A records for your services.
In my lab, I use DynamicDNS to update CloudFlare with the current IP address of my router, so that the A record I have of 'lab.fertle.com' always resolves to my router's address. From there, I create CNAMEs that point to lab.fertle.com.
From a router perspective, you just need to port forward 443 and 80 to the IP address of your docker host. Make sure those ports are open on the host's local firewall.
Docker Networking
Docker can do some complicated shit with it's networking. I don't go in for any of that, too hard. There are a couple of things to mention though.
- If you want a container to be exposed to the internet behind Traefik, it has to use the traefik_proxy network.
- If you still want to access the given service on your local LAN, as well as being behind Traefik, you need to add it to the 'default' network also.
- If you are choosing option 2, to access the service on the container from your LAN, you have to port-forward traffic out of your container. You will see in many docker-compose.yml examples, lines like this:
This is telling Docker to forward traffic from outside to inside the container. The first number will be the port your docker host is listening on (LAN side) and the second is the port inside the container.ports: - 5055:5055
Most of the time these numbers can be the same, but as you run more and more containers you will find that you'll have to change the external port number to deconflict with other containers.
Traefik
Let's start this whole thing with Traefik.
Traefik does a lot of stuff, but in our case, it's a gonna be a reverse proxy. All of your containers will sit behind it and Traefik will forward traffic to the correct container, based on some simple rules in the Traefik configuration.
Also, Traefik will use LetsEncrypt to mint real certificates for all your services. They will auto-renew every 30 days. How good is that?
Traefik itself is a container. So, here's a docker-compose for it:
services:
  traefik:
    image: traefik:latest
    container_name: traefik
    restart: unless-stopped
    security_opt:
      - no-new-privileges:true
    networks:
      - traefik_proxy
    ports:
      - "80:80"  # The HTTP entrypoint
      - "443:443" # The HTTPS entrypoint
      - "8080:8080" # Optional: Traefik Dashboard (for monitoring and debugging)
    volumes:
      - /etc/localtime:/etc/localtime:ro
      - /var/run/docker.sock:/var/run/docker.sock:ro # So Traefik can listen to Docker events
      - ./traefik.yml:/etc/traefik/traefik.yml:ro # Traefik's static configuration
      - ./acme.json:/acme.json # To store Let's Encrypt certificates (chmod 600 acme.json)
      - ./dynamic_configs:/etc/traefik/dynamic_configs:ro
networks:
  traefik_proxy:
    external: true
Before you start this container, you need to create the traefik_proxy network:
docker network create traefik_proxy
of note is the docker.sock line in this file, line 16. This is allowing the Traefik app to read information about what the docker daemon is doing, and therefore, read data about the containers that are running on your server. We will be using Labels on the containers to tell Traefik what to do. Simples.
There's another port open on this container for 8080. It provides a useful dashboard to show you the running config of Traefik. 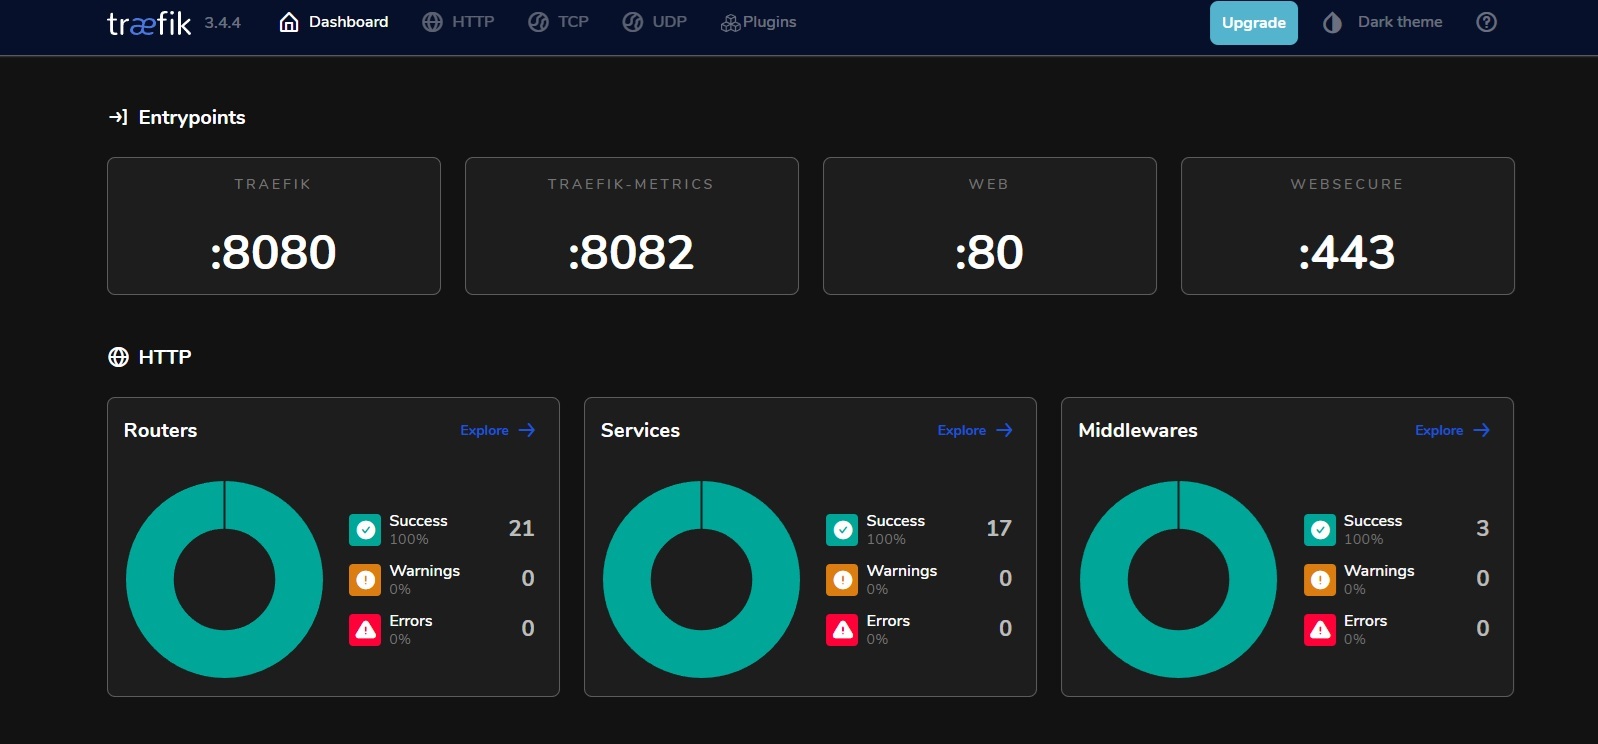
The bit you're most interested in is the Routers pane. You can see on my system there are 20 of them. Essentially one for every service I have behind Traefik.
Home Assistant
Here's a docker-compose.yml for home assistant:
services:
  homeassistant:
    container_name: homeassistant
    image: "ghcr.io/home-assistant/home-assistant:latest"
    volumes:
      - /apps/homeassistant/data:/config
      - /etc/localtime:/etc/localtime:ro
      - /run/dbus:/run/dbus:ro
    restart: unless-stopped
    privileged: true
    network_mode: host
We're using network_mode: host here, which for the most part you won't use on your containers. HA tends to work better this way, because it simplifies discovery of other things on your network (scanning for devices etc.) Using this mode means the docker container is using the IP stack of the host machine, not the IP inside docker, so you don't need to do container level port forwarding. If HA is listening on a given port, so is the host machine.
One place this messes with things (a little) is the Traefik config. Because we're in host mode and not bridge mode, we can't use container labels to tell Traefik how to configure itself for HA. The fix is simple.
In your traefik folder, create a folder called 'dynamic_configs'
traefik/
├── acme.json
├── docker-compose.yaml
├── dynamic_configs
│   ├── homeassistant.yml
└── traefik.yml
Inside that folder, create a file called homeassistant.yml and paste this:
# traefik/dynamic_configs/homeassistant.yml
http:
  routers:
    homeassistant:
      rule: "Host(`ha.beanz.com`)" # Replace with your desired domain
      entrypoints:
        - "websecure"
      service: "homeassistant-svc"
      tls:
        certResolver: "letsencrypt"

  services:
    homeassistant-svc:
      loadBalancer:
        servers:
          # IMPORTANT: Use your Docker host's IP address and Home Assistant's port (default 8123)
          - url: "http://<docker-host-ip-address>:8123"
Modify lines 5 and 17 accordingly.
At this point, you should be able to run
dc up -dGive it a couple of minutes and you can reach home assistant on http://<docker-host-IP>:8123
If you have done the DNS records and modified the homeassistant.yml file in the Traefik dynamic config directory, you can also reach HA at https://ha.beanz.com
Any issues with connecting to HA, follow the container logs with:
dcf (the alias we created before)
or
docker compose logs -f
HACS
HA comes with a lot of inbuilt plugins, but HACS opens up all sorts of options. It's a repo of plugins and addons made by the community. YMMV. Installation is simple.
Open a console into the HA container:
docker exec -it <name of the container running homeassistant> bashOnce inside the HA container, run this to download HACS:
wget -O - https://get.hacs.xyz | bash -
Restart HA, then follow the steps detailed here
It looks convoluted, but it isn't really. You will need a Github account though.
Paperless-NGX
Here we go. The granddaddy of containers. Let's kick this pig!
Here's a docker-compose.yml:
services:
  broker:
    image: docker.io/library/redis:7
    restart: unless-stopped
    volumes:
      - redisdata:/data
    # ADDED: Connect broker to the traefik_proxy network so it can be discovered
    networks:
      - default

  webserver:
    image: ghcr.io/paperless-ngx/paperless-ngx:latest # It's good practice to use 'latest' or a specific version
    container_name: paperless
    hostname: paperless
    restart: unless-stopped
    depends_on:
      - broker
      - gotenberg
      - tika
    # The ports section is not needed when using Traefik, as it handles external access.
    # ports:
    #   - 8000:8000
    healthcheck:
      test: ["CMD", "curl", "-fs", "-S", "--max-time", "2", "http://localhost:8000"]
      interval: 30s
      timeout: 10s
      retries: 5
    volumes:
      - data:/usr/src/paperless/data
      - ./consume/media:/usr/src/paperless/media # Assuming this is your media directory
      - ./consume:/usr/src/paperless/consume # Assuming this is your consume directory
      - paperless:/usr/src/paperless/export # Using your defined NFS volume for export
    environment:
      PAPERLESS_URL: https://<yourdomain>
      PAPERLESS_CSRF_TRUSTED_ORIGINS: https://<yourdomain>
      PAPERLESS_REDIS: redis://broker:6379
      PAPERLESS_DBPASS: paperless
      PAPERLESS_DBPORT: 3306
      # ADDED: Tika and Gotenberg Configuration
      PAPERLESS_TIKA_ENABLED: 1
      PAPERLESS_TIKA_ENDPOINT: http://tika:9998
      PAPERLESS_TIKA_GOTENBERG_ENDPOINT: http://gotenberg:3000
      PAPERLESS_TIKA_EML_BODY_CONTENT_TYPES: text/html,text/plain
      PAPERLESS_FILENAME_FORMAT: '{{added_year}}/{{correspondent}}/{{title}}'

    labels:
      - "traefik.enable=true"
      - "traefik.http.routers.paperless-https.rule=Host(`<yourdomain>`)"
      - "traefik.http.routers.paperless-https.entrypoints=websecure"
      - "traefik.http.routers.paperless-https.tls.certresolver=letsencrypt"
      - "traefik.http.services.paperless-svc.loadbalancer.server.port=8000"
    networks:
      - default
      - traefik_proxy

  # ADDED: Gotenberg Service
  gotenberg:
    image: docker.io/gotenberg/gotenberg:latest
    restart: unless-stopped
    command:
      - "gotenberg"
      - "--chromium-disable-javascript=true"
      - "--chromium-allow-list=file:///tmp/.*"
    networks:
      - default

  # ADDED: Tika Service
  tika:
    image: ghcr.io/paperless-ngx/tika:latest
    restart: unless-stopped
    networks:
      - default

volumes:
  data:
  dbdata:
  redisdata:
  paperless:
    driver: local
    driver_opts:
      type: nfs
      o: "addr=192.168.0.3,rw"
      device: ":/mnt/NAS-7200/NFS/Paperless/processed"

networks:
  default:
  traefik_proxy:
    external: true
There's a metric fuckton going on here. Let me break it down.
There are 4 containers in this compose:
broker
webserver
gotenberg
tika
We only need to expose access to the webserver container. Everything else runs internally inside docker.
There's a labels section inside the stanza for the webserver, with the config for Traefik. The Traefik daemon will read it and configure itself accordingly.
update this compose file to change every instance of <yourdomain> to the domain you're actually using.
Lastly, there's a docker volume definition for each container. The most consequential one is the 'paperless' volume. In my case, I am mapping the volume to an NFS share on my NAS (line 78-83). This is where paperless will store all it's documents.
If you don't specify the config of a volume, docker does the work for you and links the volume definition to directory on the localhost that Docker uses for volumes. But there are different ways of defining volumes to use network shares etc. It's worth reading the documentation about it.
Alternatively, if there is space on the localhost, you can decide not to use a volume and go with what's called a bind mount. You can just tell docker to use a directory inside the folder that has the docker-compose file and store the data there. That folder could be an NFS mount itself. It really depends on your use case. The syntax for a bind mount to replace the paperless volume would look like this:
volumes:
      - data:/usr/src/paperless/data
      - ./consume/media:/usr/src/paperless/media # Assuming this is your media directory
      - ./consume:/usr/src/paperless/consume # Assuming this is your consume directory
      - ./paperless:/usr/src/paperless/export # Using your defined NFS volume for export
Next up is the 'consume' folder. If you want to have paperless just eat whatever you copy there, then the 'consume' folder in the root directory of the app ( /apps/paperless/consume/ ) would need to be mapped to a file share that's accessible from anywhere on the network.
In my case, my NAS has an NFS/CIFS file share. On the docker machine, I map a folder on that file share to /apps/paperless/consume on the docker host.
The volumes part of the compose, mounts the folder into the container at the given path so /apps/paperless/consume will map to /usr/src/paperless/consume inside the container, which is where the paperless application is scanning for documents.
If any or all of that made sense, then you can do a
dc up -dand see if it all works .
Homepage
homepage:
    image: ghcr.io/gethomepage/homepage:latest
    container_name: homepage
    environment:
      - PUID=0
      - PGID=0
      - HOMEPAGE_VAR_TITLE=Media Server
      - HOMEPAGE_VAR_SEARCH_PROVIDER=google
      - HOMEPAGE_VAR_HEADER_STYLE=boxed
      - HOMEPAGE_VAR_WEATHER_UNIT=metric
      - HOMEPAGE_ALLOWED_HOSTS=*
    volumes:
      - ./homepage:/app/config
      - /var/run/docker.sock:/var/run/docker.sock:ro
      - jelly:/jelly
    restart: always
    labels:
      - "traefik.enable=true"
      # Router for HTTPS
      - "traefik.http.routers.homepage-https.rule=Host(`d.fertle.com`)" # <-- Use the actual domain you want for homepage
      - "traefik.http.routers.homepage-https.entrypoints=websecure"
      - "traefik.http.routers.homepage-https.tls.certresolver=letsencrypt" # Use Let's Encrypt for public domain
      # Service definition: tells Traefik the internal port of Homepage
      - "traefik.http.services.homepage-svc.loadbalancer.server.port=3000" # Homepage's primary web UI port
    networks:
      - default
      - traefik_proxy # Connect Homepage to Traefik's network
Watchtower
Trust me. You need some Watchtower in your life.
This little app will watch your containers, and when a new container image comes up on Docker Hub, Watchtower will bounce your app and update the containers automatically. Zero maintenance required on your part.
Here's a docker-compose:
services:
  watchtower:
   environment:
     TZ: Australia/Sydney
     WATCHTOWER_NOTIFICATIONS: shoutrrr
     WATCHTOWER_NOTIFICATION_TEMPLATE: "{{range .}}{{.Time.Format \"12-01-2020 15:04:05\"}} ({{.Level}})':' {{.Message}}{{println}}{{end}}"
     WATCHTOWER_NOTIFICATION_URL: "discord-webhook-here"
"
     WATCHTOWER_SCHEDULE: "0 0 4 * * *"
     WATCHTOWER_HTTP_API_TOKEN: apitoken1
     WATCHTOWER_HTTP_API_METRICS: "true"
   command: --http-api-update --cleanup
   image: "containrrr/watchtower"
   ports:
    - 1080:8080
   volumes:
    - /var/run/docker.sock:/var/run/docker.sock
   restart: always
There's a section in this compose for posting Watchtower messages to Discord. Details on how to configure this are here
The WATCHTOWER_SCHEDULE is based on simple Cron syntax, so you can configured it how you like. My example runs at 4am every morning.